Gingerbread 101

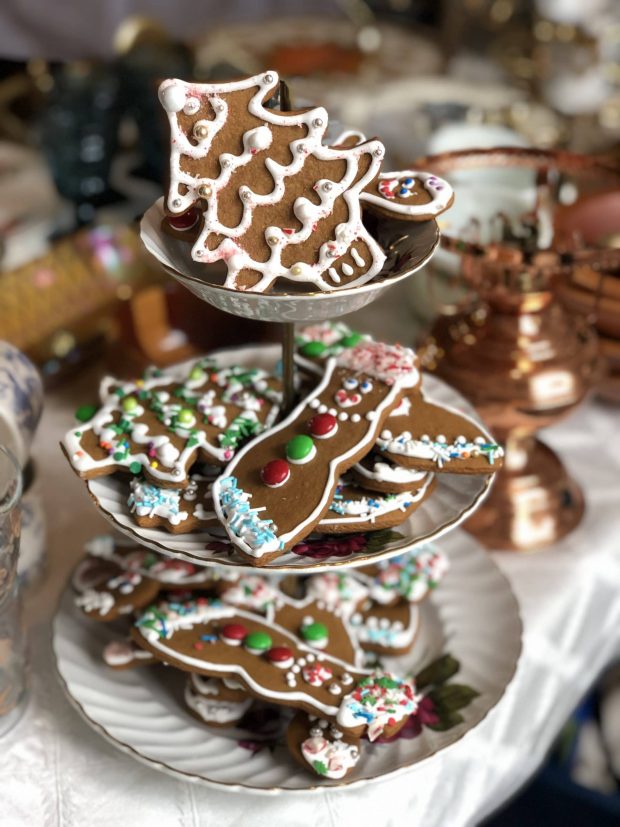
There’s only one time in the year that I break out the royal icing, the piping bag, and decorative dragées: Christmas-time, when homemade gingerbread cookies are a requirement, preferably available by the dozens. Stars, snowflakes, trees, and the essential gingerbread boy – all are shapes I have been making since I was a girl, and now create with my children.
Every step of baking gingerbread is special, from the grinding and measuring of the spices for the dough, to the rolling and cutting of playful Christmas shapes, and perhaps the most fun of all, the detailed icing work. Sometimes we’ll throw a cookie decorating party, where we ice ten dozen cookies, and coat my floor in sugar in the process; other times I’ll put on some Christmas tunes after the kids are in bed and lose myself for an hour or so creating a drift of pretty white snowflakes.
Both ways to decorate are fun, and you should definitely break out the spices and a rolling pin sometime in the weeks leading up to the holidays. This post will give you enough information to get started. Be sure to stick around for a fun giveaway at the bottom to ensure you are well equipped for the task.

Many of the tips and the gingerbread dough recipe in today’s post are from my friend Bridget of Bake at 350 and her amazing new book, Decorating Cookies: 60+ Designs for Holidays, Celebrations & Everyday![]() . Thanks, Bridget, for helping us to make the best gingerbread possible this holiday season.
. Thanks, Bridget, for helping us to make the best gingerbread possible this holiday season.
The All-Important Dough
I really love Bridget’s gingerbread dough because it is low on sugar and high on molasses. The result is a soft, dark dough, perfectly sweetened, with the flavor of molasses and spices shining through. I’m smitten and so are my children.
Want to switch things up? Shaina demonstrates that gingerbread is a most versatile dough, melding its way into different shapes, sizes and purposes, and capable of giving you a wide assortment of cookies.
Chilling & Freezing
Once the dough is made, it can chill in the refrigerator, well wrapped in plastic, for up to 5 days. Better yet, stash a few rounds of dough in a resealable bag in the freezer and freeze for 3-6 months. Gingerbread doesn’t have to be enjoyed just in December anymore!
When you are ready to roll you cookies, remove the dough from the freezer and thaw at room temperature, then proceed with the shaping.

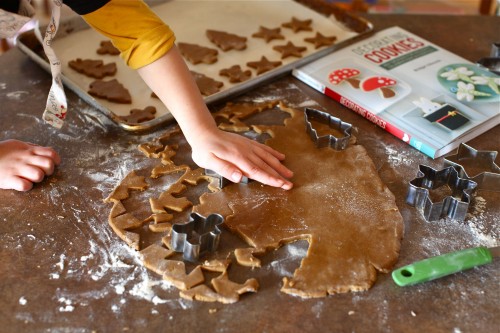
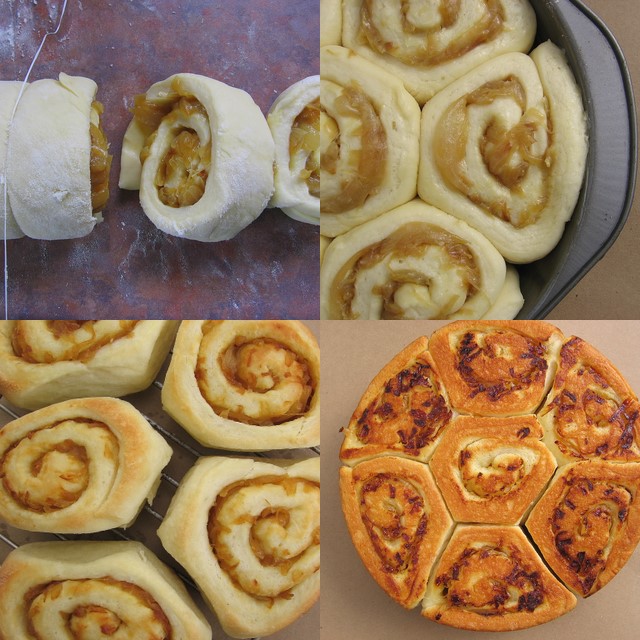
Rolling & Cutting
Bridget bides us to not fear the flour when rolling out a cookie. Indeed, liberally flouring the counter, rolling pin, and cookie cutters makes this step much easier.
- My tip is to have the dough at room temperature, so it is quite soft. There will be less cracking of the cookies, and the dough will be easier to roll.
- When the dough is rolled thin, it will bake up crisp like a cracker. When it is rolled thick, the cookies are plump and soft. Both ways are nice; the end result is up to you.
- For cutting, start at the outer edge of the rolled dough and work your way inward. Place the cookie cutters as close to each other as possible. Use a flexible spatula to transfer the cookie dough. I love this Good Grips Good Cookie Spatula
 from OXO.
Don’t forget: If you’re making gingerbread ornaments, punch out a small hole with a wooden skewer before baking the cookies so you have somewhere to tie them to your tree.

Baking & Cooling Tips
- Always make sure the oven is up to temperature before baking. I like to stick with the middle rack only, as my bottom rack occasionally burns cookies. (Because gingerbread have a lot of molasses in them, they are susceptible to burning quickly.)
- Don’t mix thick and thin cookies on the same baking sheet, as they will cook for different lengths of time.
- Allow cookies to cool for a few minutes on the baking sheet before transferring to a cooling rack.
- If you are baking ornaments, now is a good time to double check your holes and puncture them again if needed while the cookie is still soft.

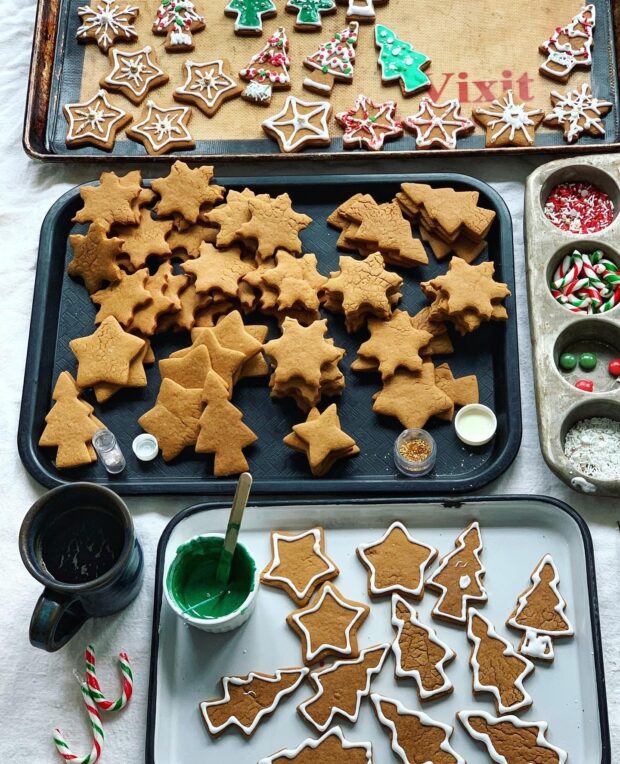
Decorating Gingerbread.
Bridget’s book, Decorating Cookies: 60+ Designs for Holidays, Celebrations & Everyday![]() is the essential guide for perfect, pretty cookies and a good place to start for your gingerbread. She also offers tips to {stress-free} cookie decorating with kids that I’ve found very helpful!
is the essential guide for perfect, pretty cookies and a good place to start for your gingerbread. She also offers tips to {stress-free} cookie decorating with kids that I’ve found very helpful!
Royal Icing is the standard frosting for decorating rolled gingerbread, so you’ll need a batch or two. Guess who has the recipe? Yep, Bridget: Royal Icing 102 and FAQ.
Plan to let the cookies dry overnight before transferring them to tins or stringing up as ornaments on the tree as the royal icing takes a good 12 hours to dry properly.
Happy baking and cookie-making!

Gingerbread Cookies
Ingredients
- 5 1/2 cups unbleached all-purpose flour
- 1 1/2 teaspoons baking soda
- 1/2 teaspoon coarse salt
- 1 1/2 Tablespoons ground ginger
- 2 teaspoons cinnamon
- 1/2 teaspoon allspice
- 1/4 teaspoon ground cloves
- 1 cup salted butter (2 sticks) cold and cut into chunks
- 1/2 cup sugar
- 1/2 cup packed light brown sugar
- 1 cup molasses
- 1 egg
Instructions
- Line three cookie sheets with parchment paper.
- In a medium bowl, whisk together the flour, baking soda, salt, ginger, cinnamon, allspice, and cloves. Set this mixture aside.
- In the large bowl of a stand mixer fitted with a paddle attachment, cream together the butter and both sugars until light and fluffy. Beat in the molasses and egg. Mix until well combined.
- Add the flour mixture in three parts, mixing on low speed until just combined. Scrape down the sides and bottom of the bowl as needed.
- Divide the dough in half and form into disks. Wrap each disk in plastic wrap, and refrigerate for at least 30 minutes.
- Prepare a rolling surface and roll out one of the disks (see Rolling and Cutting Cookie Dough on page 23 of the book).
- Cut as many shapes from the dough as possible and place them onto a prepared cookie sheet, approximately 2 inches apart.
- Preheat the oven to 350F. Meanwhile, place the cookie sheet in the freezer for 5 to 10 minutes. Freezing the cookies helps them keep their shape while baking. Meanwhile, knead the scraps and remaining dough together and continue the rolling, cutting, and freezing process on a second prepared cookie sheet.
- After freezing, immediately bake the cookies on the center rack of your oven for 9 to 12 minutes, or until the cookies appear done in the center.
- Remove the cookies from the oven and let them cool for 2 minutes on the cookie sheet. With a thin cookie spatula, transfer the cookies to a wire rack to cool completely.
- Rotate the cookie sheets from the freezer to the oven to the cooling rack until all of the cookies are baked.
Notes
Nutrition
Giveaway!

When she introduced her book for the first time, Bridget said this:
“This book is for you. You, who have never decorated a cookie. You, who have attempted and want to try again. You, who love decorating cookies and are looking for some new ideas.”
Flipping through ‘Decorating Cookies’, it’s plain to see that Bridget means every word. Comprehensive equipment lists, an in-depth troubleshooting guide, a photo index of projects, and her tried and true recipes are just some of the amazing content that comes between the pretty covers of this unique cookbook.
Today you have a chance to win a copy of Decorating Cookies: 60+ Designs for Holidays, Celebrations & Everyday![]() for yourself!
for yourself!
** This giveaway has ended. Congratulations to the winner, Nicole Reis! Thank you to all who participated.**
Good luck to all you future cookie decorators!

I guess I am a novice cookie decorator. I can do some basic decorating but I would love to practice more techniques someday! Thanks for the giveaway!
I am a beginner and am looking forward to trying out those cookies.
I like to think of myself as an “accomplished” decorator but in fact, I think I’m probably intermediate at best. Every year we make gingerbread houses and I would love to populate our landscape with beautiful cookie wildlife! Thank you for the chance to win!
I am a beginner!
I’m a novice!
I do have a question. If you prefer a more soft cookie, would you transfer to a container as soon as the icing is hard? This may be super simple, but I really have no idea!
I’m a beginner in cookie decorating.
Although I’ve baked lots and lots of cookies, I have to say I’m a beginner when it comes to decorating. They usually end up with the home made look rather than the beautiful creations that Bridget makes. Can’t wait to try out the recipes in this book. It’s definitely on my Christmas wish list.
I just picked up a vintage Gingerbread village cookie cutter set the other day and I have been searching for the perfect recipe to use. Now I have it! Thanks so much. Your cookies look beautiful.
When it comes to baking cookies, I’m an expert. When it comes to decorating them–total novice, lol!
I would love to learn some new techniques in cookie decorating!
My daughter loves to bake and read, and would really enjoy the book!
Have baked lots of cookies but the only decorating I’ve done is just spread the frosting on. This would be a nice book to have !
I am a beginner. With a toddler and one on the way I see a lot of cookie decorating in my future 🙂
I am definitely a novice.
I’m probably a novice. 🙂
I am extremely novice when it comes to decorating anything!!! I love the look but have very little ideas for where lines and colors should be, the best part is that I try and everyone get a good laugh. Maybe with this book I could get an, “Ohh wow” instead.
this would be perfect for me. Ive always been too intimidated to try and this would sure help
I’m a beginner…but really enjoy it!
I’ve been making cookies all my life!
Novice
A beginner, but I love trying!
I’ve never decorated gingerbread cookies before, but I make a mean decorated sugar cookie, so I’d consider myself an intermediate. I have a lot to learn as far as various techniques etc.
My MIL makes gingerbread all the time, but I’ve yet to give it a try. Might need to change that!
I am so a beginner when it comes to decorating cookies.
I’ve never decorated cookies before. I’m going to try these though!
I am a beginner at decorating cookies. This book would be so much help. Cannot wait to learn more!!!!!!!
I’d have to put myself as a novice – I know how to decorate cookies but I don’t often take the time to do them as nicely as possible. And they’re certainly no where near as beautiful as Bridget’s!
I’m a beginner thank u !
Oh, such a beginner!!
i would say Im a novice-my sister, her kids and mine all take a day usually 24th to decorate cookies.it is a tradition and lots of fun now that we have kids of our own.
Definitely a beginner.
Total beginner!
I am certainly no expert! I’ve decorated a few cookies in my day, but I’ve eaten more frosting (or badly frosted cookies to hide them). I suppose that would be novice? Or perhaps, in truth that would be beginner.
I’m still quite a novice. I’ve done it a few times but am by no means good at it!
Thank you so much for sharing this gingerbread recipe! I’ve been looking for the perfect one and this seems great! 🙂 I’m excited to try it!
I am very much a cookie baking novies…
Thus, I need all of the help that I can get!
Many thanks, Cindi
What great thoughts! Thanks for getting me motivated to start my holiday baking!
Totally a novice but an expert wannabe.
I am a beginner. Would love to have the artistic talent some cookie decorators have. Thanks for giveaway.
I am a beginner cookie decorator. Every time I think about decorating cookies, I get intimidated by the frosting part.
I would say intermediate-I went to culinary school, but never had much of a chance to decorate in my days in the restaurant industry.
The extent of my cookie decorating is sprinking some colored sugar on top. So, yeah, I’m a novice.
I’m past the beginner stage but not yet an expert!
I have made gingerbread cookies before, but it’s been a while. I’ve read that you can add vinegar to the cookie dough to make the dough easier to handle (and less crumbly). Have you ever heard of this?
more of a novice
I am definitely a beginner.
I’d probably say novice. Although when I look at how wonderfully some people decorate their cookies, it makes me feel like a beginner!
I’d say a novice, but I’d like to get better. Thanks for the giveaway!
A novice. My mama taught me! Now I am teaching my kids.
I have to say I’m still a novice, eager to pick up tips from those more experienced than myself.