The Health Benefits of Sourdough Bread (Recipe: Whole Grain Sourdough Bread)
Written by Shannon of Nourishing Days
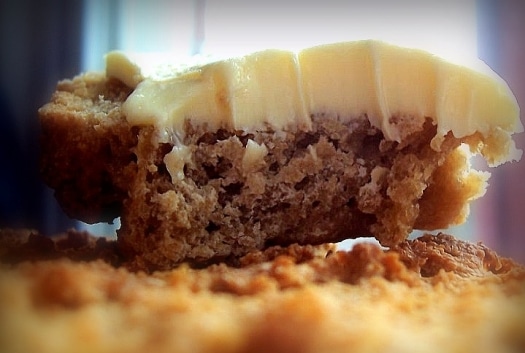
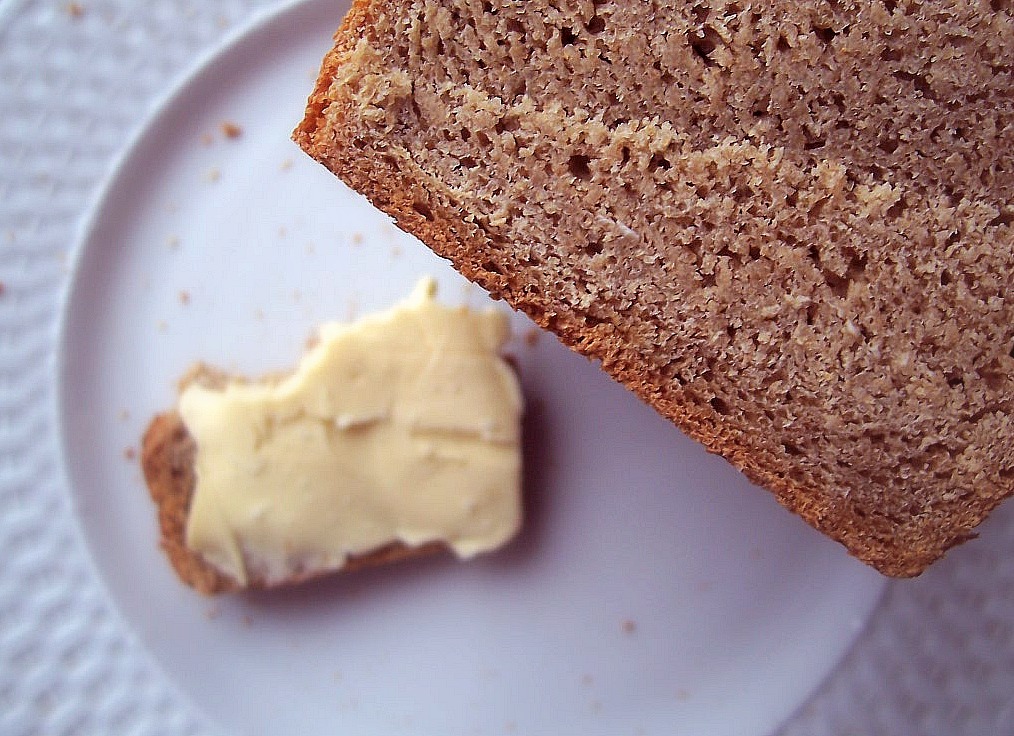
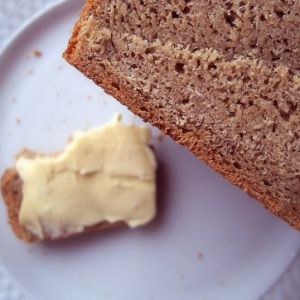
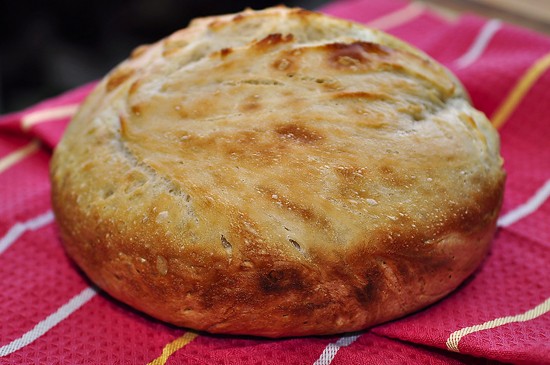
I wish you could smell this bread. It smells of handmade farm tables and loaves shaped by the hands of our ancestors. It is the kind of bread that you slather thick with butter and eat with soup when snow falls and winds howl.
This is sourdough bread – tangy and moist, dense and nutty. It is the bread made for centuries before the invention of commercial yeast packets.
For over two years we did not make or keep bread in our home for health reasons. Bread now graces our table once again, but without the ill effects we felt before. And it is all thanks to the wonder that is traditional sourdough bread and the many health benefits it contains.
Health Benefits of Sourdough
Sourdough breads are leavened by a starter that contain natural yeasts and acids. The airborne yeast creates the enzymes needed to eat up or predigest some of the toughest-on-your-belly parts of the grain. This action creates carbon dioxide, which gets trapped in tiny pockets of dough, resulting in a natural rising of the bread.
Breaks Down Gluten
The longer soaking/rising time breaks the proteins (gluten) down into amino acids, making it more easily digested. This is why some who have a gluten sensitivity can tolerate sourdough wheat breads.
Better Nutrient Profile
Like all other fermentation processes, the bacteria present in the sourdough starter eat the starch and sugars present in the grain. This results in a lowering of the starch or carbohydrate content of the bread, which is helpful for keeping blood sugar levels regulated. It also increases some of the vitamin and mineral content of the grain.
Naturally Preserves the Bread
The lactic acid in the bread creates a lovely tang and predigests the grain for you. The acetic acid produced in the souring process helps the bread to store longer, inhibiting the growth of molds.
Neutralizes Anti-Nutrients
Finally, the bacteria present in the sourdough help to activate phytase, an enzyme that breaks down an anti-nutrient present in all grains, beans, and seeds – phytic acid. This may seem minor, but phytic acid is known to strip your body of minerals and can be hard on your digestion.
None of this can be said of the quick action of commercial yeast.
Ingredients
For the Starter:
- 1 cup wheat flour on day 1
- 1 cup freshly ground wheat flour on days 2-5
For the Sponge:
- 4 cups whole wheat flour
- 2 cups active sourdough starter
For the Bread:
- Sourdough Sponge from above
- 1/2 cup melted butter or coconut oil
- 1 Tablespoon sea salt
- 5-6 cups whole wheat flour or as needed for kneading
Instructions
For the Starter:
- You can do this in one of three ways. The first is to obtain an established starter from a friend, feed it, and use it for baking. Another method is to purchase a dehydrated starter from a culture starter company and follow the directions for rehydrating, feeding, and baking with the starter.
- If you're more of a do-it-yourselfer like me, then you may want to make your own. Honestly, you won't believe how easy this is. All you need is flour, water, a half-gallon jar, and a wooden spoon. Here's how I do it:
- Day 1: Combine 1 cup wheat flour with 3/4 cup warm water. Cover with towel or coffee filter and secure with rubber band or canning ring. Place in a warm place.
- Day 2: Add 1 cup freshly ground wheat flour and 3/4 cup warm water. Ditto above.
- Days 3-5: Repeat.
- The time it takes the starter to become active will probably depend on what yeast beasts you have hanging around in your home. To maintain your starter simply feed it every day and keep in a warm place, or refrigerate and feed just once per week. I also like to pour the starter into a bowl once a week and beat some air into it with a wooden spoon.


Make Your Sponge The Night Before:
- I have found that giving the yeast time to activate without added ingredients results in a better bread. For this step you will need a large, non-reactive bowl, a wooden spoon, and the following ingredients:
- Combine all ingredients with 3.5 cups warm water and beat well to incorporate air. It should be the consistency of pancake batter. Cover with a damp towel and place in a warm place, like next to a heater or in a warm oven.
Prepare Dough to Rise & Bake:
- In the morning, get out your starter which should look active with bubbles and a bit of rising action. Give it a good stir and then remove 1 cup to set aside for your next batch of bread. To this you will add:
- Add the butter/coconut oil to starter and fold in along with sea salt. Now add the flour one cup at a time, while mixing, until the dough pulls away from the sides of the bowl, but is still a little sticky. Remove dough and place on a well-floured surface. Now knead the dough for about 10 minutes or until smooth, adding more flour to work surface as needed.
- Butter two bread pans and set aside. Now cut your dough in half and form two loaves. Place loaves in bread pans, give them a few diagonal slits with a sharp knife, cover with a damp towel (tea towel, not terrycloth), and place in a warm spot. This time of year I place them inside of my oven and turn it on warm every time I walk past.
- At this point you wait until the loaves have risen past the top of the pan. Depending on how active your starter is this could take a couple hours or you may be baking bread around dinner time. This is something you have to make peace with when you bake with sourdough bread.
- Once the loaves have risen to your liking you will bake them in a 350 degree oven for 45 minutes to an hour, or until the bottom of the loaf sounds hollow when you thump it. Remove loaves from pans and place on a cooling rack to cool completely before slicing.
Nutrition
There are many different ways to make sourdough bread, and I encourage you to experiment. That is the beauty of sourdough – besides it’s health benefits, it is also extremely versatile.
Have you made sourdough bread? Will you, now that you know of the benefits?


Can’t wait to try making my own sourdough bread. 🙂
Can you use barley flour, oat flour or rye flour instead of wheat flour if there is a wheat intolerance?
Kristin J. – Yes! I have had rye sourdough and it is delicious, and some say the most nutritious of sourdough breads. I am going to try my hand at this since I don’t do well with wheat and just purchased a large quantity of rye berries :).
Would you recommend soaking the rye berries first then drying them and then grinding them into a flour? I’m really getting into the whole soak the grain before you eat it!
Kristin J – Actually, that’s the beauty of sourdough. The leavening process is a fermentation/soaking process. I am finding that souring through the sourdough process produces better results than simply soaking.
I usually purchase a loaf of sourdough from a local shop because I love it, but I might give making it a try. You make it sounds so easy and not scary!
always wondered why more companies don’t sell a whole wheat or whole grain sourdough …
thinking about making a starter this week … but can’t find a warm place anywhere to store it!!
cheers!
I have mine right next to a radiator because it is pretty cool in our home as well. Others put it in an oven with a pilot light or light bulb on.
Hi Steve – check out our website, http://www.storyebread.com. We’re new on the scene, but we sell sourdough rye breads. 2 of our varieties (classic & classic with carrots) are 100% whole grain rye. All of our breads are handmade, with all natural ingredients.
dumb question … is a poolish the same thing as a starter or as a sponge?
Steve – I believe so. I think it is an (eastern?) european term for sponge.
I must not have had enough coffee yet! I would really like to try this, but I’m a little confused. Can you explain this step a bit more? After you make the sponge (using the starter you have already created?) , the next morning you remove 1 cup of which – the sponge or the starter? And then, do you add the rest of the ingredients to the 1 cup you have removed or to what’s left of the starter/sponge after you remove the cup? Can the cup you have removed go back in the jar with the rest of the starter or has it now transmogrified into something else altogether?
Meg – In the morning that big bowl you mixed up is basically 100% starter, but it is also your sponge. What I mean by that is that because you added flour, water, and left it to soak in a warm place overnight you have basically made a ton of starter, but it will be used as a “sponge” in the bread making process.
So take 1 cup of that sponge and set it aside as your next starter or add it to your jar of starter because they are now basically the same thing.
I am new to making sourdough bread and I wondered the same thing, so thank you for clearing that up! I have already started my starter and I am super excited! I am guessing when people share their starter it would be that one cup pulled out? I have several people who would love a sourdough starter, should I just share the 1 cup or can I share more from my jar? Thanks again for posting! I will be sure to pass along your recipe!
I had the same question, it was a little unclear if you add the bread ingredients to the sponge or to the 1 cup of removed sponge.
Lisa – Definitely to the sponge :).
Sounds delicious! I can’t wait to try making my own!
I’ve always wanted to make a whole wheat sourdough bread. Thanks for this! I’m going to give it a try.
If you are using a sprouted grain, is making sour dough bread redundant for phytic acid reduction and the benefits of gluten reduction and vitamin boosting?
Sherie – Yes and no :). It is redundant because souring is possibly the best method of reducing phytic acid. If you think about the soaking process – add water, acid, and keep in a warm place – you are basically trying to mimic the souring process, but nothing is as good as the real thing.
On the other hand if you are going to make bread from sprouted flour you have to have leavening. And I prefer sourdough to commercial yeast for health reasons, so it isn’t a bad idea to leaven sprouted flour with sourdough.
This is awesome!! Never knew sourdough had many nutritional value. Gotta make this soon 🙂 Thanks for the recipe!
You’re welcome!
Great post! I have yet to make my own sourdough but can’t wait to use this as a reference when I do.
Great post. I used to work at a bakery and sourdough was always my favourite, fresh out of the oven! I now don’t eat a lot of bread as I no longer work there, but making my own bread has been on my list of things to try. Do you have any other bread recipes?
Emma – As of right now, no. I will be experimenting with rye in the coming weeks, though, so if you watch my blog I may post a recipe. I’ve also been wanting to make sourdough cinnamon-raisin bread so that might come up at nourishingdays.com as well.
Thanks for the recipes! I have 2 questions about it, based on a previous failed experience with making my own sourdough starter 😛
In order to keep this starter warm enough while it is first “growing”, can I place it in out closet that holds the furnace? We keep our house kind of chilly to save pennies, and I’m concerned about the starter dying.
Also, you said a non-reactive bowl. I have a stainless steel bowl that goes with my kitchen aid mixer – is that a reactive bowl or can I use it for this bread?
We love sourdough bread, and I would love to be able to make it, since I never buy it! Thanks 🙂
Hi Steph! To answer your questions… Yes on putting it in a warm closet. Just be sure it’s not about 110 degrees or so. Too warm and you kill it!
I believe stainless steel is considered non-reactive, but some hardcore sourdoughers would say use glass or plastic. I am guessing, though, that aluminum and copper are what they are really referring to as non-reactive, so go for it.
Thanks, Shannon! I’m looking forward to trying this SOON, then.
I never knew that it helped to break down gluten, that’s very interesting, I had however noticed that the bread did last longer than others.
Thank you for a comprehensive tutorial! I’ve attempted sourdough before with poor results, but I’d had trouble finding all the information I needed in one place (amazingly!) – this is great!
When I got to the part about adding melted butter or coconut oil (saturated, as opposed to olive oil: unsaturated) I told my husband, “Now SHE knows what she’s talking about!” He heartily agreed! I haven’t found many baking recipes, yet, that follow the rule of applying heat only to saturated oils. Thank you for that!
I am excited to try this. I tried a different one a couple of weeks ago, but left it on the counter to rise & the house is just too cold right now. I am going to have to stick it in the oven with the light on.
Thanks again!
Aly. Kat. – Haha yes indeed – olive oil is for salad dressings only in our home. Butter, lard, coconut oil, and beef tallow are our cooking fats of choice.
Hi Shannon! Okay, I read all the comments & Q&A and I’m still a little confused. So my Day 1 did not go so well. I mixed 1 C WW flour + 3/4 C water and I ended up with a sticky dough. Nothing liquid about it to make bubbles. This morning I found the top had created a hard ‘crust’ on top and adding the same ratio of ingredients only resulted in more stickiness… nothing like your picture. 🙁
I’m also confused on my upcoming days… on Day 6 do I seperate out 2 cups of the starter into a big bowl for the sponge? What do I do with the remaining “not-yet-starter?” dough?
What do I feed my starter weekly? the same 1C WW flour + 3/4 C water?
Then for my next batch, do I begin at Step 2? It calls for 2 C active starter but I’ve only removed 1 for the fridge?
I’m sorry to be so super “squeaky” but I am really REALLY excited about your recipe and I don’t know what I did, or what to do, to bake that beautiful bread! I’ve tried many recipes in the past and have yet to find one that I like so I am really hopeful here… please help! 🙂
Bethany – I wouldn’t worry too much about the texture for the first few days. If it seems to sticky for you, add a little more water to thin it out. A lot of bread baking has to do with the humidity in your home.
On day 6 you use 2 cups of the starter for making bread (assuming that starter is active) and the other cup you can feed and refrigerate for next week’s feeding/baking. Then that extra cup you can add to your starter since you have already saved starter.
For your next batch of bread you’ll want to be feeding your starter daily, or refrigerate and feed it weekly. You will then repeat the whole process with the starter that you keep alive.
I have been making sourdough bread for awhile now, and yes, it is QUITE dense, but your comment about slathering it with butter and having it with hot soup… heck, I’ve been known to make beef stew, just so we have something to go with the bread! Oh, and sourdough cheddar cornbread, with chili? Get out of town!!!
Okay, now, Shannon, will you please clear something up for me? I may be a bit dense (as dense as my sourdough bread? LOL), but I’m not sure how we’re supposed to tap the bottom of a loaf of bread that’s still baking? Are we supposed to pop it out of the pan, give it a thump, and if it’s not hollow-sounding, throw it back in the oven? Seems to me this might damage the insides of a not-quite-done loaf… Anyway, I typically bake it in smaller glass or stoneware pans (talk about a die-hard!), and since I never understood the tapping the bottom, I am left thumping the top of the bread and guessing how done my bread is.
On the note of die-hard, I also make my own kombucha, and the term “reactive” absolutely applies to plastic in that case. Because of the acid levels in sourdough, I would avoid using plastic (that’s my personal thought, based on the combination of warm plus acid might=leaching stuff from plastic), and if my glass bowl was unavailable would consider my mixer bowl the next best thing. There are different quality stainless steel bowls out there and cheap materials would be a concern, but I don’t think KitchenAid makes THE cheapest version (tongue-in-cheek, there…), or any other quality mixer-maker either, for that matter. It would seem that they would want their units to be as non-reactive as possible. Cast iron, on the other hand, is very reactive (just put a tomato-based anything in it, and stick it in the fridge overnight if you don’t believe me… No wait, please don’t do that. Just take my word for it!). However, my favorite for when I’m making a lot of sourdough and have a large batch to sour (think church bake sales and family coming over for the holidays)? My enameled Le Creuset stock pot! Of course, this definitely has to go into the oven-incubator, because the metal underlying the non-reactive enamel will be cooler and could hamper activity of the yeastie beasties… There are whole followings of “bucket sourdough” out there, where people make up a large weekly batch of sourdough (not starter, but the dough itself, saving the last bit to work as a new starter) and then stick it in the fridge after it’s soured, and then throughout the week, grab enough to make whatever they’re in the mood for–biscuits, bread, pizza… Of course, for those that are on a reduced-grain agenda that shouldn’t be having that much going on at once!
mmm… now why didn’t I sponge my sourdough last night???
Dani,
Yes, the tap it on the bottom advice sounds a little funny. I do actually turn the loaf out of the pan, thump the bottom by flicking my index finger, and listen for the sound. If it’s not quite done I put it back in. I believe you can also use an instant read thermometer and look for about 210 degrees (?).
Thanks for the tips on the pans/bowls!
I’ve never thought of whole grain sourdough… just always made it the traditional way! Great post 🙂
Thank you for a great article! One of these days I’m actually going to try it. 🙂
do you need to use bread flour or can you use just plain ol’ whole wheat flour? bread flour isn’t available where i live.
You could use either, I am guessing. I have never tried this bread with anything but home-ground whole wheat flour, but having previously baked breads I am guessing bread flour would be a great option.
This is interesting because you only do one rise with this recipe. The sourdough recipe I’ve been using has 2 rises, first one in the bowl for 6-8 hours, second one in the pan for 2-4 hours. This could seriously cut some time off my bread baking (spoken by someone who has stayed up way too late at night waiting on bread that was started too late in the day)! I’ve stuck with my “tried and true” recipe for many months now, but I think I will give this one a try. 🙂
And, I have to say, maybe I’m strange & the only one in the world who feels this way, but there are two types of photos on food blogs that gross me out. 1) pictures of food with teeth marks in it, and 2) pictures of kids eating food with their mouths open. Blech.
Lisa – Yes, I believe one could make sourdough with a myriad of methods, this is simply the one that has been working for us. I will check yours out as well on your blog.
Really wanting to try this! I am concerned because I do not sprout and grind my own flour. Will store bought whole wheat flour work? This will be my first attempt and baking bread and don’t want to spend the money on equipment. Any advice?
Thanks!
Angie
Angie – Absolutely store-bought will work. The key with whole grain flours is to get the freshest you can. The oils in whole grains will go rancid after a bit of time so you want to purchase it at a place that has a good turnover. Bulk bins at a health food store are a good place. Storing the flour in the freezer or refrigerator also helps to extend its shelf life.
The recipe works well, but I split the loaves into 3 pans to allow the bread to rise more. This helped to make bread lighter and not as heavy.
I am using my own starter from whole wheat and have found it to have a very strong “sour” flour. Using this recipe and no honey to sweeten it seems to have made even more sour.
Next week when I make it again I am going to add a half cup of local honey to give it a little sweetness.
good point, I love the bread, but it is very sour … will try to add more to mine next week too
adding honey will not necessarily make your loaf sweeter. You will taste the honey but if you want to sweeten sourdough you add some baking soda. It works in a lot of my sourdough stuff. The bread I am making now has commercial yeast so I will be trying this recipe and will add the baking soda if needed.
I made the starter and then the bread … fabulous! I did add one tablespoon of honey to my starter on day one only. Then, yesterday, when I made my bread, I added about 1/2 c softened cracked wheat, a few tablespoons of flax seeds, and 1/2 cup of raw sunflower seeds … this bread is just amazing … thanks!!
Waoo!! Love the idea of adding flax seeds, etc.
I love it, nothing beats a proper sourdough loaf, but It’s something i’ve never tried myself. I think I just keep chickening out.
I will have to give it a try following your recipe.
Thanks For the excellent recipe
I know I’m late in asking questions about this so hopefully I get a reply of some sort. With making the starter, you add the flour and water for each of days 3,4,5 correct? That’s what you mean by repeat above? I just have seen other instructions say leave it alone, and others have you remove half each day when adding or “feeding” it.
I’m on day 3 of the starter and it’s pretty thick, so I am thinking I will need to be adding equal parts of water and flour, which I started today. I live in a pretty dry climate. I’m really excited and hoping for success with this recipe! Just wanna make double sure I’m doing things correctly. 🙂
Nicole – Yep, add both the flour and water on days 3, 4, and 5.
I work at Chefs Catalog store in Colorado where we do cooking classes. Recently we finished a 2 part Sour Dough class and I made a starter from some Antique Starter dough that was going to be tossed. I’ve been playing with this and also using an excellent article from “Cooks Illustrated” on Sour Dough. The long and short is I’ve noticed suddenly my finger nails are looking amazing. Long, healthy and shiny….I’m 50, and Colorado is so dry thev’ve not been so great. But I find my nails reflect my eating habits. So anyway that led me to start looking up the health benefits of the Sour Dough. (My teenage daughter also noticed her nails growing in a way they never had before) Now this isn’t about our nails- but what other health benefits are we getting from the bread that we don’t see?
The downside is I have a sugar sensitivity and I usually don’t eat white bread…so I think I’ve gained a bit….so my search is leading me to a whole wheat SD where the absorption of carbs is slower. Anyway I’m looking forward to trying your recipes.
Oh, dear – I used 1 cup of water and 3/4 cup of flour just now, for the first day of the starter! What effect will that have, if any?
Okay – no need to answer the previous question. I just adjusted the proportions the next day.
I kept the starter going for five days, then put it in the fridge. The next day, I made the sponge. I left it overnight. The following day, it was bubbly. I put it in the fridge. The day after that, I mixed flour with it to make a dough. I put it back in the fridge. (In case you’re wondering why I kept refrigerating it, I had a bad cold and I was too tired to do very much at once.)
Today, I took the dough out of the fridge, kneaded it, put it in loaf pans, and set it to rise. It hasn’t risen at all, that I can see. Is this because of the refrigeration, or is it not warm enough at room temperature? Should the dough be warmer? And if I just leave it as it is, will it eventually rise?
A while back, I had heard that sourdough bread was supposed to be much healthier than regular/commercial breads, but I couldn’t find out what made it healthier. I just stumbled onto your website, and am so glad to finally find this nutritional information. I really want to try this out asap! Thank you so much!!
Question – Another source suggested that a beginner start out with an unbleached white flour to ensure success, and then gradually convert her starter over to whole wheat. Personally, I try to stay away from white breads. Is the whole wheat sometimes tricky to use? Your instructions make it sound as though it’s simple enough, but I’m wondering how it is for a beginner.
Also, do you know if it makes a difference whether or not the flour is organic?
Lastly, what equipment do you have to have to grind your own grain? Would a regular blender work, or does it take something more industrial strength?
Sourdough is really the most nutritious dough to bake.. It is so nice of you to share this to us..
I am so checking out your blog. I found this post searching for info on sourdough because I *think* it might be curing my IBS. Which is funny because I went wheat-free earlier this summer because of blood sugar issues, but recently re-integrated bread in the form of sourdough per my family’s request. Just on an occasional basis. I’m actually beginning to think that maybe the cure for my IBS is not eliminating a trigger food (I haven’t been able to identify any one trigger yet in 10 years of this) but integrating MORE fermented foods. Which is good, because I adore sourdough bread!
I am just starting to experiment with sourdough. My first loaves were very heavy and dense. Do you know if this may be a problem with my starter or not allowing enough rising time? Can’t wait to try your recipe next.
Hello,
Your bread looks sooo delicious. Don’t you think buying a starter from a reputable lab would be beneficial to assuring you’re actually getting the conversions due to the proper flora. I just decided to make sourdough since I was ordering tempeh and kefir cultures from gemcultures.com. I saw they had sourdough and said hey why not. Anyone looking into optimum health should consider purchasing the same cultures to help you process your food.
Hi Shannon,
I am trying SD starter for the first time. I started this morning with unbleached white flour SD starter recipe and it looks like is fermenting well. But I really want to make a whole wheat SD starter soooo I kept searching and found you!!
Thank you very much for the recipe. I live in Panama and right now is summer time but still humid, starter is mix up and hopefully starting to bubble up.
We have been making sourdough for years but I have never made a 100% whole grain version. I’m getting ready to mix up the sponge now. Thanks for the recipe!
Good Grief…Can anyone tell me why my loaves are not rising much?
I made my starter with 1c white flour and 1 c warm water plus a tbls of honey for the first day, then poured half off on day two and topped up each day with 1c WW and 1c of warm water. Did this for 12 days in a warm environment. Yesterday evening I made the sponge. All these steps seemed to work well. This morning I made the dough as per the above recipe, only I converted the WW flour with 12 grain whole flour (full of great things) and used the coconut oil….folded in about 5.5c of the flour and made the dough. I split the dough into 3 parts. One regular sized loaf and 2 smaller flattened balls that were placed in greased clay 6″ saucers. All that was done by 11:30 today….it is now 10pm and the loaves are rising at a gerriatric snails pace…I see that the sliced on the tops are parting…but oh soooooo slow. With any luck it may be ready for marmalade in the late morning!!!!!
ANY suggestionsa would be welcomed and yes, your site is the best one out there for sourdough making and explaining, so kodos to you for that!!!
Definitely trying this. Got my starter made now just waiting the the yeasties to do their thing.
I see that peopke make speciality bread, biscuits, pancakes, etc with SD. Do you have any recipes or favorites you make?
Thank you for the recipe!
Thanks for the post. After a year and a half of grain free we are giving soaked and sourdough a second try. I noticed that you only do the one rise. Is that common to traditional sourdough?? I had thought you were suppose to punch down and do the whole 2 rise thing. Am wondering if that is why I have struggled to get a good rise out of the sourdough? Any thoughts?
hi
love your instructions…and love sour dough..
Made it with a link to you…http://baketitude.blogspot.in/2012/05/artisan-whole-wheat-atta-sour-dough.html
Am now going to try and vary the flavours…cheers!
How do you know when the sourdough starter is activated?
Hi there. I was wondering if anyone has tried this with any gluten free whole grains like sorghum. We cannot have gluten at the moment. I have been using a sandwich bread that uses a GF sourdough starter but the basic flour mix uses potato and tapioca starch and the recipe also needs xanthan gum. I would love a gluten free sourdough bread like this one that is whole and simple. If anyone has any suggestions please let me know! Thanks in advance.
Have you ever tried to freeze the sourdough bread dough before baking?