Lemon Raspberry Layer Cake and a ‘Pat the Bunny’ Birthday

I already said my birthday congratulations to Mateo, so let’s get straight to the cake, shall we?
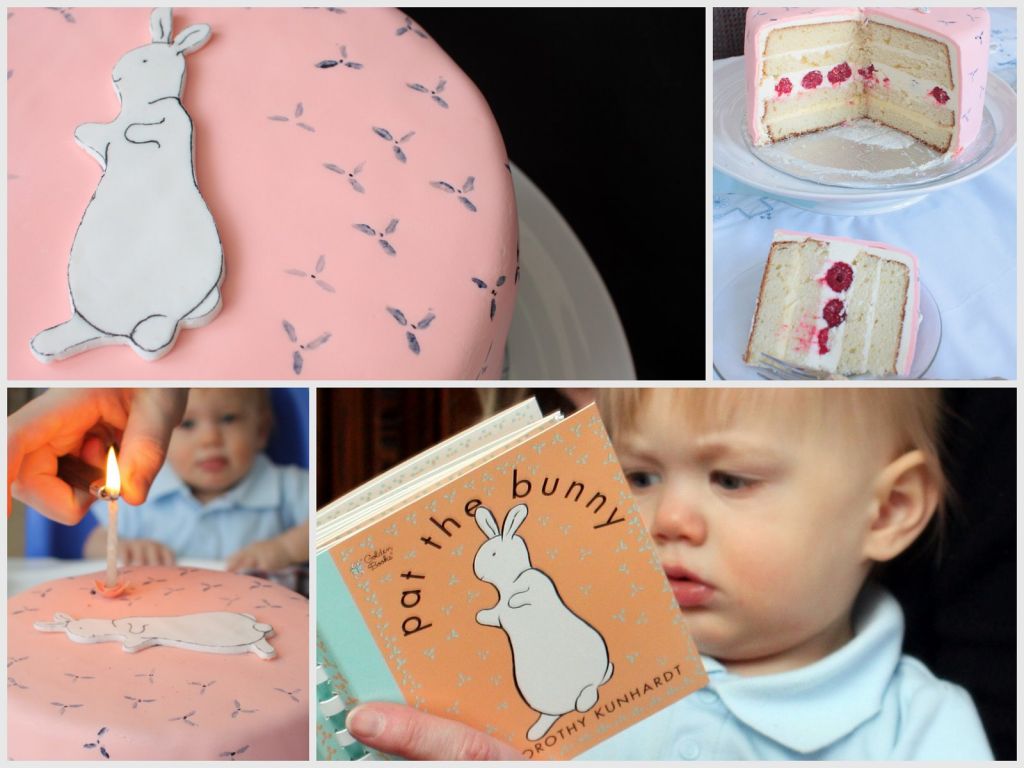
Now, as much as I love the typical ABC baby blocks/first birthday cake in its every form, I wanted to do something a little more original for Mateo, and so his tattered and much-loved ‘Pat the Bunny‘ book became the inspiration behind this cake. Here’s how it came together…
Flavors:
I loved this cake and was thrilled with how it came out! Friends who follow me on Twitter know how I haggled over the perfect flavor combination for this birthday. Chocolate and Chestnut? Too mature. Carrot and Maple? Too predictable. ( I see soooo many carrot cakes for a baby’s first birthday, and most of the time they are the recipe from ‘What to Expect…’)
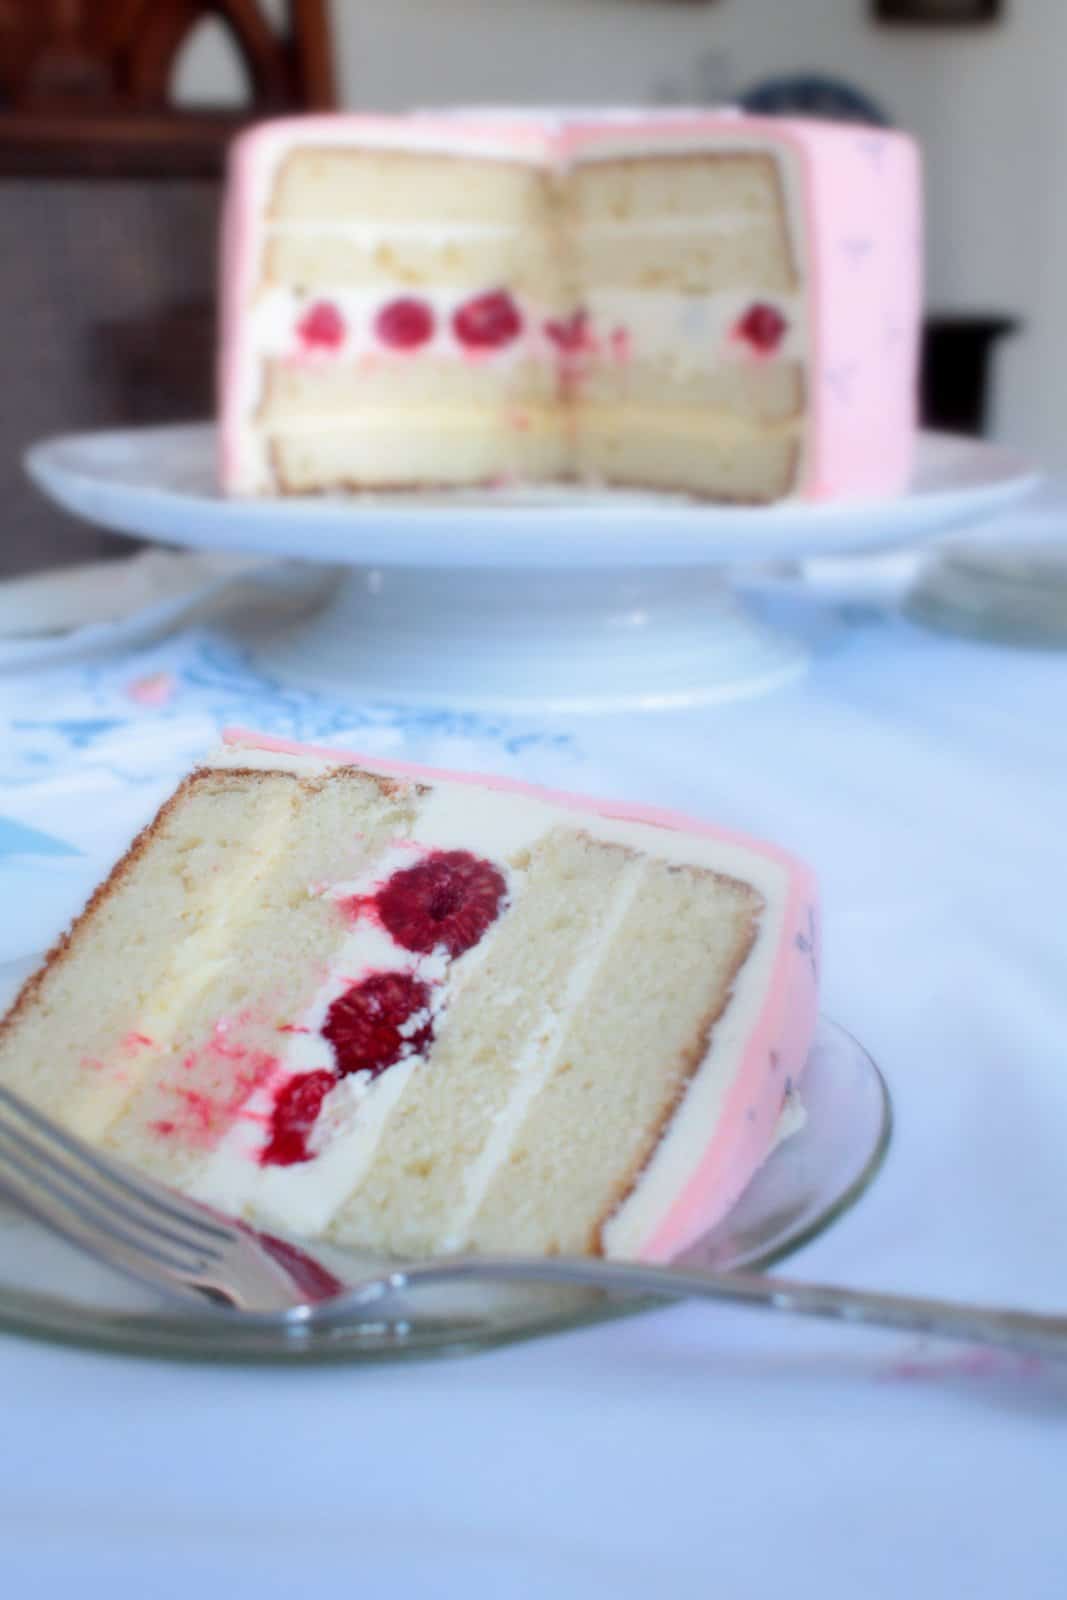
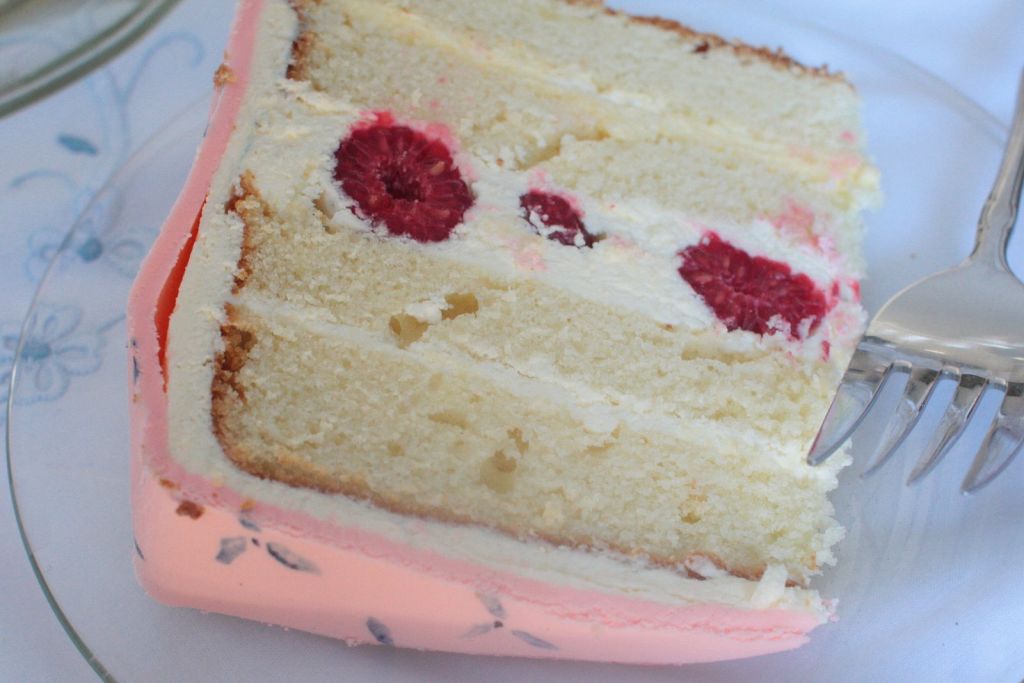
I started with the marvelous yellow butter cake from Martha Stewart’s Baking Handbook and her classic Swiss Meringue buttercream. Then I had four egg yolks left over from the buttercream and fresh lemons to use up, so I made a tangy lemon curd and folded it into the buttercream. I sandwiched some fresh raspberries between the middle layer of cake, covered the entire project with Satin Ice rolled fondant and served it with a raspberry coulis.
It was fantastic!
This cake would be a showstopper even without the rolled fondant icing. The spectacular lemon buttercream can certainly stand on its own, so don’t sweat it if you are not up for the fondant. It would dazzle simply topped with a few fresh raspberries.
This cake felt like spring; and on a freezing cold March day, that was a good thing. In fact, as I was eating a slice the next morning for breakfast (perfectly acceptable, as long as the little ones don’t see) I was remarking on how it would make a lovely wedding cake. Hey, spring IS coming sometime, and with it many opportunities for C-A-K-E: graduations, wedding showers, birthdays…Oh, OH–Mother’s Day!
You better make a mental note of that: Aimée’s Lemon Raspberry Cake for Mum.
Decorations:
Even though the cake’s interior was pure Martha Stewart, the design and decoration was all my idea and execution.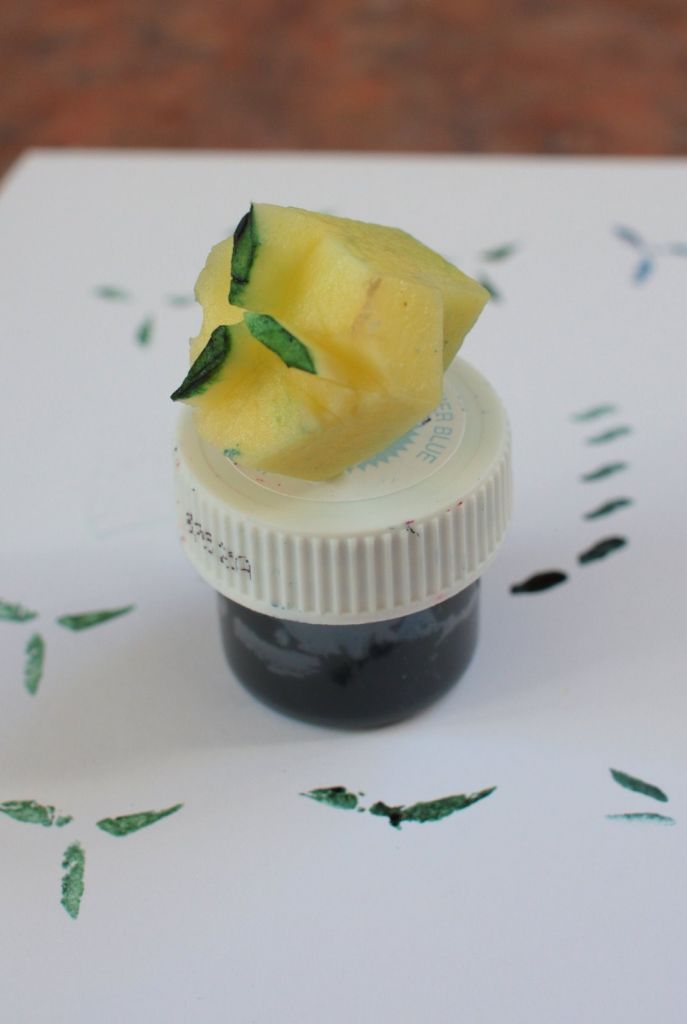
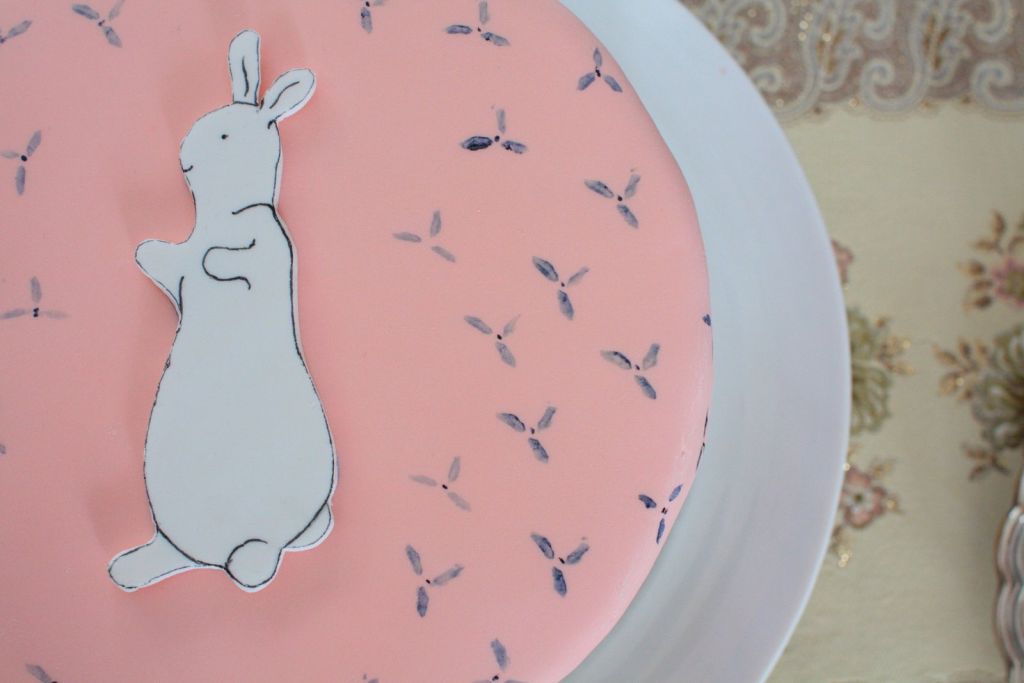
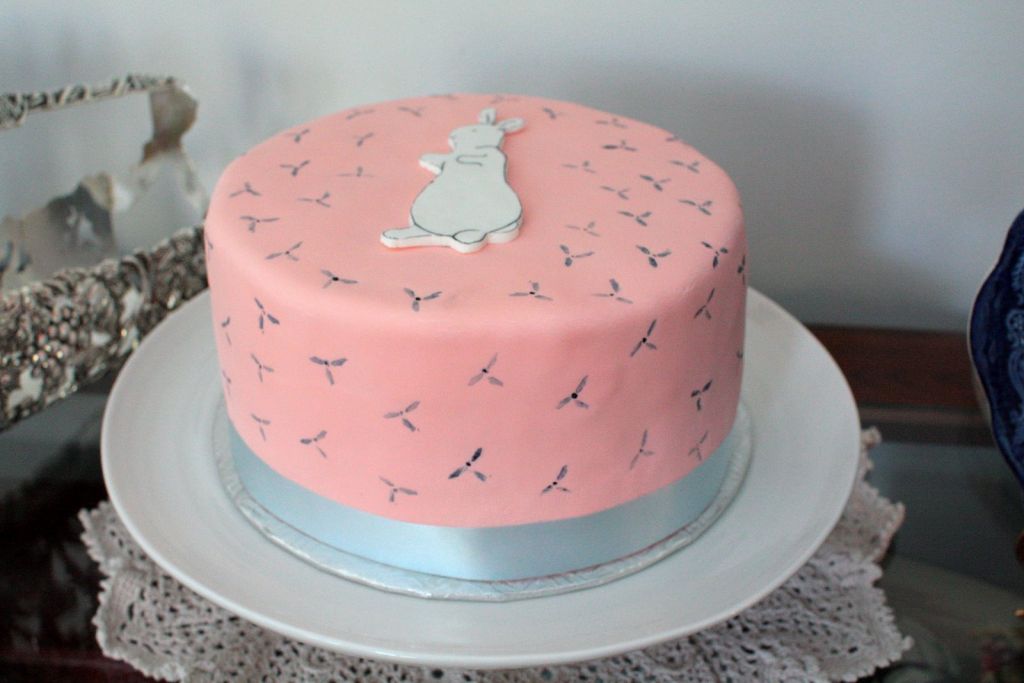
- The bunny was cut out of plain white rolled fondant and the markings added with edible marker. He came out quite cute, I thought!
- I dyed the fondant peach (although it was pinker than I would have liked) and pinned a blue ribbon around the bottom.
- For the pattern on the fondant, I wasn’t sure how to add the delicate three petaled flowers, as I certainly was not going to paint them on by hand. So I quickly carved a makeshift stamp out of a potato, dipped it into the food coloring and went nuts all over the cake. It took about five minutes and gave the effect that I wanted. Never underestimate the lowly potato!!
- The invitations used a line from the book: “How Big Is Mateo? Sooo Big!” and I was originally going to pipe this onto the cake; however, I chickened out! I just don’t like writing on cakes: I don’t like how it looks and I don’t like doing it, so I stamped the top, too.
Looking to plan a party for your baby?! I’ve included some ideas at the bottom of the post on how to host your own Pat the Bunny theme party too. Yay!
Recipes:
All adapted from Martha Stewart’s Baking Handbook
Yellow Butter Cake
yields two 8-inch round cakes
2 sticks (1 cup) unsalted butter, room temperature, plus more for pans
1 1/2 cups all-purpose flour, plus more for pans
1 1/2 cups cake flour (not self-rising)
1 tablespoon baking powder
1/2 teaspoon salt
1 3/4 cups sugar
4 large eggs
2 teaspoons pure vanilla extract
1 1/4 cups milk
Directions
1. Preheat oven to 350 degrees. Butter two 8-by-2-inch round cake pans; line the bottoms with parchment paper. Butter parchment, and dust with flour, tapping out excess; set aside. Into a medium bowl, sift together flours, baking powder, and salt; set aside.
2. In the bowl of an electric mixer fitted with the paddle attachment, beat the butter and sugar until light and fluffy, 3 to 4 minutes, scraping down the sides of the bowl as needed. Beat in eggs, one at a time, then beat in vanilla. With the mixer on low speed, add the flour mixture in three parts, alternating with the milk and beginning and ending with the flour; beat until combined after each addition.
3. Divide batter between the prepared pans, and smooth with an offset spatula. Bake, rotating the pans halfway through, until cakes are golden brown and a cake tester inserted into the center comes out clean, 30 to 35 minutes.
They may look like they are going to overflow the pan, but don’t worry they will be fine and you will end up with nice fat layers for your cake. Transfer pans to a wire rack to cool 20 minutes. Invert cakes onto the rack; peel off the parchment. Re-invert cakes and let them cool completely, top sides up.
Lemon Swiss Meringue Buttercream
Makes about 4 cups, perfect for this cake.
4 large egg whites
1 1/4 cups sugar
1 1/2 cups unsalted butter, room temperature, cut into tablespoons
3/4 cup lemon curd (recipe below)
In the heatproof bowl of an electric mixer set over a saucepan of simmering water, combine the egg whites and sugar. Cook, whisking constantly, until the sugar is dissolved and the mixture is warm to the touch.
Attach the bowl to the mixer fitted with the whisk attachment. Beat the egg whites on high speed until stiff peaks form. Continue beating until the mixture is fluffy and cooled, about 6 minutes. Switch to the paddle attachment.
With the mixer on medium-low speed, add the butter several tablespoons at a time, beating well after each addition. If frosting appears to have separated after all the butter has been added, beat on medium-high speed until smooth again.
(Aimée’s Note: I do this every time. It brings the buttercream from a runny whipped cream consistency, to a thick frosting consistency. I prefer to work with it like this.)
Beat on low speed to eliminate any air bubbles. Stir in lemon curd with a spatula until smooth. Frosting is now ready to use or it may be refrigerated in an airtight container for up to three days. Before using, bring to room temperature.
I love this lemon curd recipe. It requires you to make it with the zest of the lemon, but at the end the zest is strained out through a fine sieve. This imparts the maximum lemon flavor, but the curd still has a silky smooth consistency. Mmm.
Lemon Curd
Makes 1 cup–enough for the buttercream with a bit leftover for you to scarf.
4 large egg yolks
Finely grated zest of 1 lemon
1/4 cup freshly squeezed lemon juice (about 4 lemons)
1/2 cup sugar
5 Tablespoons unsalted butter, cold, cut into pieces
Prepare an ice bath fitted with a medium bowl; set aside. Whisk together yolks, zest, juice, and sugar in a small saucepan. Set over medium heat, and stir constantly with a wooden spoon. Cook until mixture is thick enough to coat the back of the wooden spoon, 5 to 7 minutes. Remove pan from heat. Add butter, 1 piece at a time, stirring until incorporated. Pass through a fine mesh sieve into prepared medium bowl. Stirring frequently, let stand until cool.
Place a sheet of plastic wrap directly on surface of curd to prevent skin from forming; wrap tightly. Refrigerate until firm and chilled, at least 1 hour. Store refrigerated in an airtight container for up to 2 days.
Assembly:
2 8-inch round Yellow Butter Cakes
Lemon Swiss Meringue Buttercream
1 pkg fresh raspberries
1 1/2 lbs rolled fondant (optional)
icing sugar
Slice cakes lengthwise in two ( I like to have them very cold for this part) so that you have four rounds.. Place the bottom layer on a cake stand and top with about 3/4 cup of lemon buttercream. Top with cake layer. Spread a thin layer of buttercream and top with a layer of fresh raspberries. Smear a generous amount of buttercream across the berries so that it fills any gaps.
Top berries with another round of cake, coat with buttercream and place the final layer of cake on top. Frost all over with remaining buttercream. Chill until very firm.
Dust counter with icing sugar and roll fondant into a circle measuring 14 inches in diameter. Lift gently and place on top of cake. Smooth sides, trimming excess fondant. Dust hands with icing sugar and smooth out air bubbles from top and sides. Decorate as desired.
Chill until ready to serve.
How to Plan a ‘Pat the Bunny’ Birthday Party:
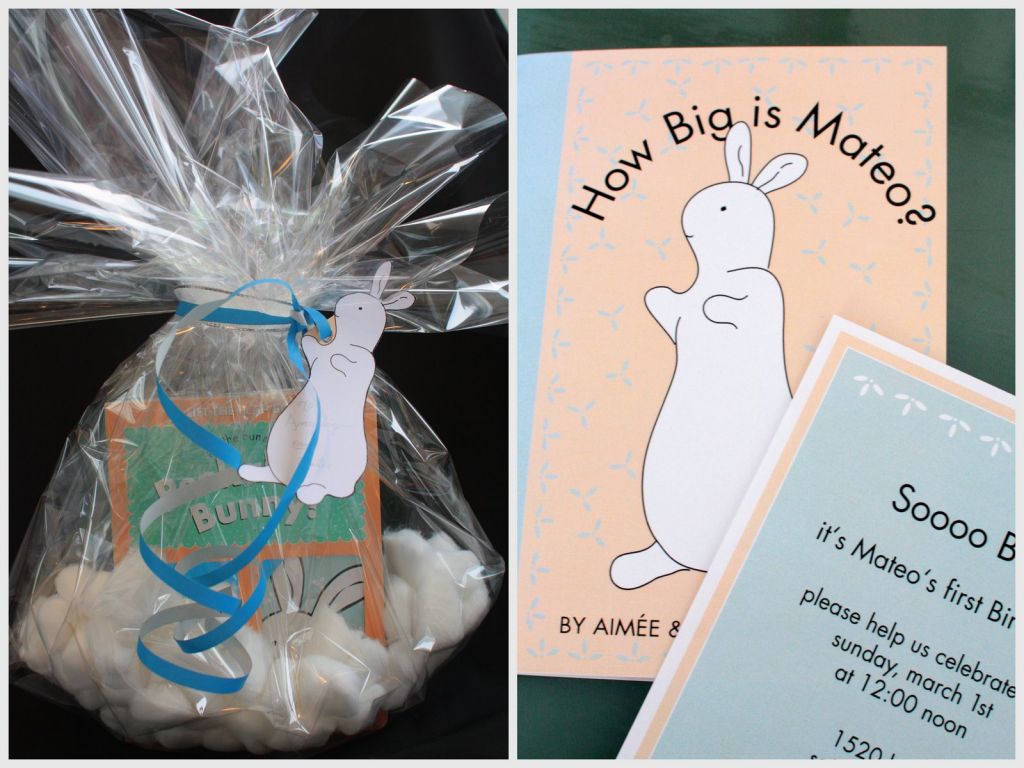
OK, I can take credit for the cake, but the rest of this was the creative thinking from the super talented Abigail from Piece of Cake. Trust me when I say she has the credentials, and I don’t just mean graphic design! A master party planner, she processed my idea for a Pat the Bunny cake faster than my PC can re-boot, and offered these amazing (and affordable) suggestions for the whole Pat the Bunny experience! Abigail is also half the team behind the fabulous creations at paper and cake. You’ll never stress over another party again thanks to their adorable downloadable templates. Abigail designed Mateo’s darling birthday invitations (pictured above), which I’ll be saving for years to come. Thanks Abigail!
Party on!
Color scheme: turquoise, peach and white
Decorations:
- Make cut outs of rabbits, carrots, or little bunny footprints of construction paper and affix to the walls or windows.
- Purchase ribbon to swag everywhere.
- Make a garland with the baby’s name by cutting letters out of peach/turquoise paper and gluing them to the opposite color cardstock and threading on a ribbon across the room/door/window.
Goodie Bags:
- Pat the Bunny puppets
- Bunny ear headbands
- Pat the Bunny book in a clear cello party favor bag filled with some cotton balls and tied with your peach/turquoise ribbon. (My goodie bag is pictured above. I gave the book Peakaboo Bunny.)
Craft: (If the children are old enough)
- Pat the Bunny coloring sheets (print from here) available on a kid’s table covered in butcher paper, lots of crayons.
- Cut the bunny shape out of contact paper and affix (double sided tape, staple, glue) to peach or aqua cardstock. Adults will be needed to help the kids peel off the contact paper backing, then the kids can stick on cotton balls and maybe googly eyes too. This could also be done with glue, but it might get messy.
Activity:
- Hide stuffed bunnies around the house, and have the kids go on a bunny hunt.
- Play a touch/feel game. Put ultra textured items in a box or bag, show a picture of the item before having each child find that item (ie. pinecone) without looking.
- Read Pat the Birthday Bunny or Pat the Bunny

WOW!! The cake is amazing, simply amazing! It looks delicious!! What a cute little guy too! Happy Birthday!
Ack! Fondant scares me, but I’m pretty sure you’re a genius (potato stamp WHOA). I loved Pat the Bunny, and it makes such a cute cake!
What Adrienne said–the rest of it is pretty fabulous too, but the potato stamp is pure genius.
That is so beautiful. I can’t wait until my sons first birthday.
Mateo is so lucky to have such a talented mom!
aimee…. you are such a sweetheart! you’re making me blush a little 🙂
im so happy mateo’s day turned out perfectly! and i am totally stealing your cake recipe for jack’s 4th!
Wow, I’m not much of a baker, but you’ve made this cake look so simple… I think I might just give it a try for Easter, sans fondant as that still scares me. Great post!
Impressive and adorable! Love all the thought and detail that went into the party. Very creative!
The cake is gorgeous! It even LOOKS like spring 🙂
I’m a big fan of kids birthday parties that don’t rely on the $ store for every single aspect.
What a wonderful idea! That was one of my favourite books when I was a toddler, thirtyish years ago…
A Happy B-day to the wee one and I must say…it would be fun eating that cake from both sides to get to that center.
I am hosting a baby shower in June ( yes I am already thinking about the food) and I think this may be my cake of choice. The lemon curd was an awesome idea. YUM YUM YUM
I am hosting a baby shower in June ( yes I am already thinking about the food) and I think this may be my cake of choice. The lemon curd was an awesome idea. YUM YUM YUM
You have my vote for mom of the year! This is spectacular!!! I’m glad to see you didn’t let him go face first into it. 🙂
I haven’t seen a cake this gorgeous in a long time. I mean, it looks absolutely divine. Wow, I want to make it just so I can have something as pretty in my house. And to top that off, I can only imagine how AMAZING it must taste!
Hi Maria- Nice of you to say so, thank you!
Hi Adrienne- Fondant can be a pain, but there’s nothing technical about a potato stamp!
Roving Lemon- Thanks. It came to me in a flash. We used to do it as kids with paints and paper, so why not grown-up play, too?
Hi M. Houseman- The first year goes by so fast…
Hi Abigail- You deserve every word! Hope you give the cake a shot–Jack will thank you!
Hi Jessica- I’m already thinking of how to dress it up for Easter, because it would be perfect in every way!
Hi Cheryl- Thanks, the party was pretty simple as I didn’t do ALL the suggested activities. (none actually)!!
Hi Jess- Too true. They are more memorable too (because everything is hand made)
Hi Hilary- Both my boys love it. Such a classic! I love to give it our at baby showers.
Hi Peter- Thanks! I’ll pass along the well wishes.
Hi md_witmer- This would be so cute for a baby shower. Hope you try it out!
Hi culinarywannabe- Really!?? Thanks for the vote!! Yeah, I’m not a huge fan of the face-first-icing-up-to-the-ears tradition.
Hi elyse- Sweet of you to say so! A cake must taste as pretty as it looks, right?
That is soooo adorable! That was my children’s favorite book too. Have you got Dinosaur’s Binkit? That was another favorite. You are very creative!
I’m definitely going to remember this cake recipe. Mom’s birthday is next month and I think it would be perfect.
It’s a stunning cake! I can only imagine how delicious it was.
Your boys are so lucky to have your for their mama! What a gorgeous cake.
Beautiful cake that I’m sure was made with lot’s of love.
that is the prettiest cake ever. amazing!!!
I just started taking a cake decorating class so this is really inspiring…and that filling looks incredible
This is pretty much the cutest cake ever. I love it!
And the flavour combos in there sound so heavenly. What a perfect cake.
I am awed by the look of this cake, I can only imagine what it tasted like. Happy B-day to your little guy. In regards to fondant..how do you make it / where to buy it in Montreal? Annie.
What a creative gal you are. It all looks gorgeous and delicious too. I wish I had a little one so I could replicate this whole party.
I love your new banner. The artwork is very nice. My kids loved Pat the Bunny too, almost as much their Mommy. They are all grown up now. Happens fast! The Cake, is the best. I don’t like writing either. Your crafty design is so clever and cute. Mateo is a lucky 1 year old babe. The most elegant 1 year old’s BD cake!
AmyRuth
wow aimee you’re so talented this is gorgeous! Can’t believe Mateo is a year already either!! Congrats to you all!
Oh my word! I made this for Paul’s birthday and it smells and taste fantastic. I didn’t have quite enough icing and no raspberries so I used the rest of the curd in the center over the cream filling. I didn’t use fondant either so it’s not a work of art. We’re having a house full of people so the look of it isn’t “WOW” but once they take a bite, I’m sure they’ll forget. Thanks very much.
Really spectacular job. Better than anything you can buy and I’m sure it tasted fantastic too!
Hi Shari- I haven’t heard of that one. Must look for it.
Hi Emily- You would do your mom proud. I can’t wait to see what kind of spin you put on it.
Hi Lynn- Thanks! I’m blessed to have them for my boys.
Hi Helene- It was, thanks.
Hi Kickpleat- How nice! Thank you!
Hi Olivia- Have fun with your class.
Hi Kim- Lemon and berries are sure to please a crowd.
Hi Annie- You can get your cake supplies at lagaterie.com in the West Island. email me if you have more questions, OK?
Hi Linda- Thanks!
Hi AmyRuth- I try to avoid writing on cakes at all costs!
Hi Rachel- The year flew by. Thanks for the congrats.
Hi Kelly- Awesome. Happy birthday to Paul.
Your cake was gorgeous.
Besides being a wonderful cook & baker you're also a great party planner/host and of course mom!
~ingrid
Beautiful! I just have to say you’ve inspired me. I’m getting married this fall and I’ve been humming and hawing over whether I should try and make my own wedding cake (with help of talented friends and fiance of course!), and I think I’m finally decided. I’m going to do it! Thank you so much for the great cake recipes, and your easy to follow explanations of how you assemble everything! You rock!
Using a potato brings me back to preschool – my earliest memory is of making potato stamps for a mother’s day card.
Mateo was one lucky boy!
Just too darn cute and delicious too Aimee:D Happy birthday once again to Mateo!!
Oh i like this!
Jen Ramos
'Cards & Prints You'll Love…'
http://www.madebygirl.com
madebygirl.blogspot.com
Made this cake this week-end for a baby shower. It was AWESOME!! I also made a raspberry sauce to go with it. Everyone raved over it! I will definately make this one again, thanks for sharing!
Thanks for sharing this birthday. I was already planning to do a "Pat the Bunny" party for my daughter's 1st b-day. I tried the cake this last weekend, and for my first try everything went fairly well. Everyone who were my cake testers said that it was very yummy and I agree!
I second Adrienne, fondant scares the crap out of me, but you make it look so easy! And the potato stamp?! I'm adding it to my repertoire, I'd have never though to use such a versatile tool. Bookmarked for future use when my kids are of age!
I made this cake for my friend's birthday last weekend – it was incredibly delicious and your instructions were really good and detailed. Thank you so much for sharing this wonderful cake!
I made this cake for my daughter's birthday and posted pictures (with your link)! Adorable! Thank you!!
poppyhop.com
Laura